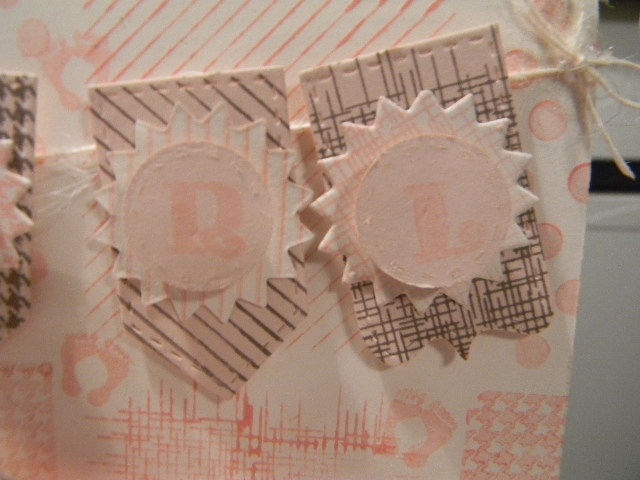
These darling little cards started with PTI Vintage Cream Cardstock and My Creative Time's Build a Banner Kit . I made my own background with PTI Sweet Blush and Spring Rain ink using the stamps from the banner set. The letters are very subtle, not too dark. I was going for delicate. Momento Rich Cocoa was also used .Sweet Blush and Spring Rain cardstock from PTI for the banner, stamped and layered pieces. The letters for "boy" and girl" are from My Creative Time's Anyday Bingo & Crossword stamp set. I finished with some PTI ribbon in the same colors and a bit of button twine also from PTI.
I so wish I could take better photos, but these will have to do:)
I thought this would be fun to enter
Pause Dream Enjoy Challenge #1: Use Ribbon
Hello, welcome to "Kindred Kreations"
This blog is about our life at home, and away from home... everyday happenings, and special occasions. We enjoy a variety of pastimes, but our main joy is making "Kindred Kreations". Thank you for joining us in our journey of growing together through faith, family, love for learning, projects, and more.
Saturday, January 19, 2013
Thursday, January 17, 2013
Thanks Snow Much! for the Exploring Cricut Challenge
Still working on those thank you notes!
These snowman cards were fun to make and pretty easy. I used the Winter Frolic for this cut, the sentiment is from My Pink Stamper's Winter Punnies. Such a cute set. The paper was from my scraps, except the card base and that is from Recollections.
Exploring Cricut Baby I'ts Cold Outside Challenge!
Head on over and see what the design team came up with. Really cute projects!
These snowman cards were fun to make and pretty easy. I used the Winter Frolic for this cut, the sentiment is from My Pink Stamper's Winter Punnies. Such a cute set. The paper was from my scraps, except the card base and that is from Recollections.
Exploring Cricut Baby I'ts Cold Outside Challenge!
Head on over and see what the design team came up with. Really cute projects!
Wednesday, January 16, 2013
More Cupcake cards
Here are a few more little cupcake cards I created. I have decided that since my card stash is pretty much depleated I need to make them in quantities for awhile.
I used a cupcake themed 6x6 pad and Peachy Keen Stamps Everyday Character Assortment for the cute little faces on the cupcakes. The sentiments are from My Pink Stamper's Cupcake set. I purchased that set a year or so ago and have been wanting to use the cute little sentiments.
Tuesday, January 15, 2013
Peachy Keen Challenge:13-2 Sketch
Cupcake Birthday Card
Hello my crafty friends, today's post is a sweet little cupcake card I made with Peachy Keen sketch challenge in mind. I had a little bit of a different take on where the sentiment is placed. This little card is for a little girl turning 6, I think it's a bit busy, but little ones seem to like that:)
I found this cute little 6x6 paper pad full of cupcakes. I couldn't resist. I used the Everyday Character Assortment for the cupcake and used some "bubble" paper for the background and stamped little Peachy Faces on that as well.The banner is cut from a Spellbinder set and haven't used much, but love how it turned out. The sentiment is from the Peachy Keen January Stamp of the Month. I just joined and am really excited to receive some crafty inspiration each month. Be sure to visit the Peachy Keen Challenge Blog
for some fun projects and inspiration.
(I would also like to find a scrapbook kit of the month club but I don't even know where to start. Any suggestions? I like the idea of having papers and embellishments from different companies, but when I do a search, it's pretty overwhelming.)
Hello my crafty friends, today's post is a sweet little cupcake card I made with Peachy Keen sketch challenge in mind. I had a little bit of a different take on where the sentiment is placed. This little card is for a little girl turning 6, I think it's a bit busy, but little ones seem to like that:)
I found this cute little 6x6 paper pad full of cupcakes. I couldn't resist. I used the Everyday Character Assortment for the cupcake and used some "bubble" paper for the background and stamped little Peachy Faces on that as well.The banner is cut from a Spellbinder set and haven't used much, but love how it turned out. The sentiment is from the Peachy Keen January Stamp of the Month. I just joined and am really excited to receive some crafty inspiration each month. Be sure to visit the Peachy Keen Challenge Blog
for some fun projects and inspiration.
(I would also like to find a scrapbook kit of the month club but I don't even know where to start. Any suggestions? I like the idea of having papers and embellishments from different companies, but when I do a search, it's pretty overwhelming.)
Thursday, January 03, 2013
Personalized Vinyl Project with the Cricut
Happy Thursday everyone, today I had a little time with the boys to create a personalized project for each of them.
I purchased these little stools at IKEA a while back with the intent of personalizing each for the boys.
I used Cuttin' Up Cartridge for the font and cut the letters at 4"
The dolphin and whale were cut using the Splish Splash Cricut Lite Cartridge. There were only a couple of cuts so it made layering with the vinyl easy. I really love working with vinyl, the finished projects are always so fun. I used the vinyl I already had in my stash. It's definitely time to replenish some colors. I really could've used some light blue.
The boys of course love anything with their name on it, so these were a big hit.
I purchased these little stools at IKEA a while back with the intent of personalizing each for the boys.
I used Cuttin' Up Cartridge for the font and cut the letters at 4"
The dolphin and whale were cut using the Splish Splash Cricut Lite Cartridge. There were only a couple of cuts so it made layering with the vinyl easy. I really love working with vinyl, the finished projects are always so fun. I used the vinyl I already had in my stash. It's definitely time to replenish some colors. I really could've used some light blue.
The boys of course love anything with their name on it, so these were a big hit.
Tuesday, January 01, 2013
Welcome 2013!
Hello everyone, hoping all of you had an amazing new year's eve. It was pretty quiet here. My hubby and I welcomed in the new year with Seth dozed off between us on the couch. Such a cutie, he made it until after 11! We toasted with a bit of champagne, thankful for another year together with our family and health...knowing that at anytime that can change. It truly is a gift.
I made this little champagne bottle tag so we could welcome in the new year with a bit of fun.
I used the Stretch Your Imagination Cartridge with the blackout and silhouette feature. I cut it twice at 7"
and trimmed the bottom so I could give some dimension to the bow and bottom of the stem. Glossy accents gave it shiny liquid-like look, while the little gems were just for some blingy fun.
The wine-bottle tag is a die from PTI.( I actually purchased it last summer to make tags for 100 water bottles for a wedding I helped with. ) I used a cuttle bug folder on the die and the sentiment is cut using an EK Success label punch with a sentiment from My Creative Time's Mixed Holiday Sentiments Set
This is my entry at Exploring Cricut's last Challenge of 2012! New Year's Celebration!
I made this little champagne bottle tag so we could welcome in the new year with a bit of fun.
I used the Stretch Your Imagination Cartridge with the blackout and silhouette feature. I cut it twice at 7"
and trimmed the bottom so I could give some dimension to the bow and bottom of the stem. Glossy accents gave it shiny liquid-like look, while the little gems were just for some blingy fun.
The wine-bottle tag is a die from PTI.( I actually purchased it last summer to make tags for 100 water bottles for a wedding I helped with. ) I used a cuttle bug folder on the die and the sentiment is cut using an EK Success label punch with a sentiment from My Creative Time's Mixed Holiday Sentiments Set
This is my entry at Exploring Cricut's last Challenge of 2012! New Year's Celebration!
Sunday, December 30, 2012
Santa Tags
I made a few last minute tags using the Christmas Cheer Cartridge. The Santa was cut at 4 1/2" and the tag at 5". The layers were cut twice, once in black and once in white. So easy! I embossed both the Santa and tag using Cuttlebug folders. I added a little glitter to one of them and a half pearl on his hat, tied some ribbon to finish it off.
I am entering these tags over at Party Time Tuesdays Anything Goes Challenge
Thursday, December 27, 2012
Gift boxes and tags with my Tablescapes: Fall and Winter Cartridge
Hello Everyone,
I trust your Christmas was wonderful with special times to be had by all.
I am so thankful for the memories with family and friends. We are truly blessed.
This project is for a couple of gift cards for nieces and nephews. I cut the box from Tablescapes: Fall and Winter at 5 3/4". ( Fit to Page). Sara and I made several of these, they were also great boxes to hold the gloves we made.
The Reindeer and Bird tag were cut from Create a Critter 2 at 3 1/2". These layers are so easy to put together and finished the boxes with some wired ribbon.
This is my entry for More Than Favors Wacky Wednesday Challenge: Christmas Theme
I trust your Christmas was wonderful with special times to be had by all.
I am so thankful for the memories with family and friends. We are truly blessed.
This project is for a couple of gift cards for nieces and nephews. I cut the box from Tablescapes: Fall and Winter at 5 3/4". ( Fit to Page). Sara and I made several of these, they were also great boxes to hold the gloves we made.
The Reindeer and Bird tag were cut from Create a Critter 2 at 3 1/2". These layers are so easy to put together and finished the boxes with some wired ribbon.
This is my entry for More Than Favors Wacky Wednesday Challenge: Christmas Theme
Monday, December 24, 2012
Guest Designer for Exploring Cricut: Christmas Advent Activity Project
Hello everyone,
What an honor to be a guest designer for Exploring Cricut
The inspiration and wonderful projects are terrific!
This project was so fun to make. I am hoping to use it for years to come.
I used several cartridges for this project.
The boxes are from the Tablescapes: Fall and Winter Project cartridge. They are cut at 5 3/4", so that I could get two per 12x12 sheet of paper. The score lines were easy to follow and only one strip to glue! (I used Scotch Quick Dry) So easy!
Embellishments are from the Gingerbread solutions cartridge: these little images were cut at ", I love that the images only have a couple of cuts so it makes assembly easy.
The envelopes and cards inside are from the Cindy Loo cartridge: The these are probably my favorite find! I just love the little scalloped edge on the flap of the envelope and the card fit just perfectly inside. These were cut at 5" and easy to score and glue.
The numbers on the envelopes are from Storybook.
I used some yarn and mini clothespins to hang the goodies.
Sara was such an inspiration with ideas and making the creations. There's nothing like and extra pair of creative hands.
Each little box has treats inside and each envelope has an activity to do each day.
I kept it simple this year as the boys are just 5 and get a bit wiggley if our project are too long.
Some of the activities are:
Tell the Christmas Story
Watch a Christmas movie
Decorate the tree
Make a homemade ornament
Sing Jingle bells
Wish everyone in the house Merry Christmas
Look at neighborhood light displays
Purchase and deliver a toy for the toy drive
well....you get the idea.
What an honor to be a guest designer for Exploring Cricut
The inspiration and wonderful projects are terrific!
This project was so fun to make. I am hoping to use it for years to come.
I used several cartridges for this project.
The boxes are from the Tablescapes: Fall and Winter Project cartridge. They are cut at 5 3/4", so that I could get two per 12x12 sheet of paper. The score lines were easy to follow and only one strip to glue! (I used Scotch Quick Dry) So easy!
Embellishments are from the Gingerbread solutions cartridge: these little images were cut at ", I love that the images only have a couple of cuts so it makes assembly easy.
The envelopes and cards inside are from the Cindy Loo cartridge: The these are probably my favorite find! I just love the little scalloped edge on the flap of the envelope and the card fit just perfectly inside. These were cut at 5" and easy to score and glue.
The numbers on the envelopes are from Storybook.
I used some yarn and mini clothespins to hang the goodies.
Sara was such an inspiration with ideas and making the creations. There's nothing like and extra pair of creative hands.
Each little box has treats inside and each envelope has an activity to do each day.
I kept it simple this year as the boys are just 5 and get a bit wiggley if our project are too long.
Some of the activities are:
Tell the Christmas Story
Watch a Christmas movie
Decorate the tree
Make a homemade ornament
Sing Jingle bells
Wish everyone in the house Merry Christmas
Look at neighborhood light displays
Purchase and deliver a toy for the toy drive
well....you get the idea.
Saturday, December 22, 2012
Christmas Treat Boxes for baked treats
These boxes were cut from the Sweet Tooth Boxes Cartridge and were easy to assemble especially with the help from Adam my 25 year old son and hubby! They are such good sports.
The boxes are cut at 11 1/2 ". There isn't much waste with a 12x12 piece of paper and look so darling with the ribbon and and tags. The tags were cut from the Joys of the Season Cartridge at 4". They are embossed with a Cuttlebug folder and the sentiment came from the Pink by Design Stamp set "Tags and Treats". I always have trouble stamping in white, but let's face it, it's two days before Christmas and I HAVE to get these treats delivered! And since I had twenty or so to make, it really did become a bit of a production. I know you get it. Mom's do soooo much because we want everyone to feel special, right?
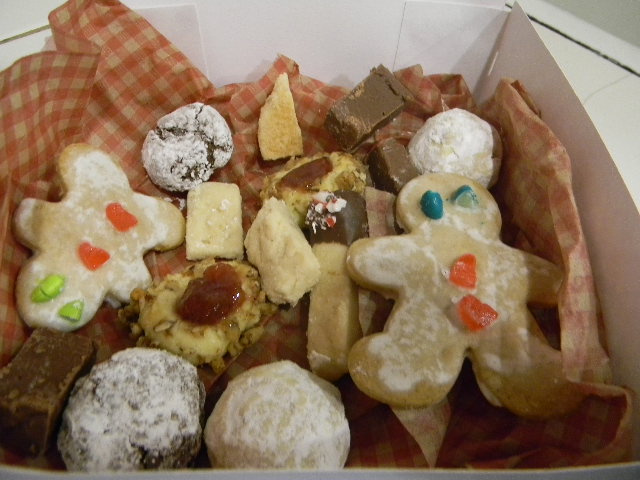
They are filled with gingerbread men, chocolate crinkles, fudge, thumbprint cookies, tea cookies and shortbread dipped in chocolate. Yummy!!
Entering this project over at Celebrate the Occasion #93 Anything Goes!
The boxes are cut at 11 1/2 ". There isn't much waste with a 12x12 piece of paper and look so darling with the ribbon and and tags. The tags were cut from the Joys of the Season Cartridge at 4". They are embossed with a Cuttlebug folder and the sentiment came from the Pink by Design Stamp set "Tags and Treats". I always have trouble stamping in white, but let's face it, it's two days before Christmas and I HAVE to get these treats delivered! And since I had twenty or so to make, it really did become a bit of a production. I know you get it. Mom's do soooo much because we want everyone to feel special, right?
They are filled with gingerbread men, chocolate crinkles, fudge, thumbprint cookies, tea cookies and shortbread dipped in chocolate. Yummy!!
Entering this project over at Celebrate the Occasion #93 Anything Goes!
Subscribe to:
Posts (Atom)