Hello everyone,
What an honor to be a guest designer for Exploring Cricut
The inspiration and wonderful projects are terrific!
This project was so fun to make. I am hoping to use it for years to come.
I used several cartridges for this project.
The boxes are from the Tablescapes: Fall and Winter Project cartridge. They are cut at 5 3/4", so that I could get two per 12x12 sheet of paper. The score lines were easy to follow and only one strip to glue! (I used Scotch Quick Dry) So easy!
Embellishments are from the Gingerbread solutions cartridge: these little images were cut at ", I love that the images only have a couple of cuts so it makes assembly easy.
The envelopes and cards inside are from the Cindy Loo cartridge: The these are probably my favorite find! I just love the little scalloped edge on the flap of the envelope and the card fit just perfectly inside. These were cut at 5" and easy to score and glue.
The numbers on the envelopes are from Storybook.
I used some yarn and mini clothespins to hang the goodies.
Sara was such an inspiration with ideas and making the creations. There's nothing like and extra pair of creative hands.
Each little box has treats inside and each envelope has an activity to do each day.
I kept it simple this year as the boys are just 5 and get a bit wiggley if our project are too long.
Some of the activities are:
Tell the Christmas Story
Watch a Christmas movie
Decorate the tree
Make a homemade ornament
Sing Jingle bells
Wish everyone in the house Merry Christmas
Look at neighborhood light displays
Purchase and deliver a toy for the toy drive
well....you get the idea.
Hello, welcome to "Kindred Kreations"
This blog is about our life at home, and away from home... everyday happenings, and special occasions. We enjoy a variety of pastimes, but our main joy is making "Kindred Kreations". Thank you for joining us in our journey of growing together through faith, family, love for learning, projects, and more.
Monday, December 24, 2012
Saturday, December 22, 2012
Christmas Treat Boxes for baked treats
These boxes were cut from the Sweet Tooth Boxes Cartridge and were easy to assemble especially with the help from Adam my 25 year old son and hubby! They are such good sports.
The boxes are cut at 11 1/2 ". There isn't much waste with a 12x12 piece of paper and look so darling with the ribbon and and tags. The tags were cut from the Joys of the Season Cartridge at 4". They are embossed with a Cuttlebug folder and the sentiment came from the Pink by Design Stamp set "Tags and Treats". I always have trouble stamping in white, but let's face it, it's two days before Christmas and I HAVE to get these treats delivered! And since I had twenty or so to make, it really did become a bit of a production. I know you get it. Mom's do soooo much because we want everyone to feel special, right?
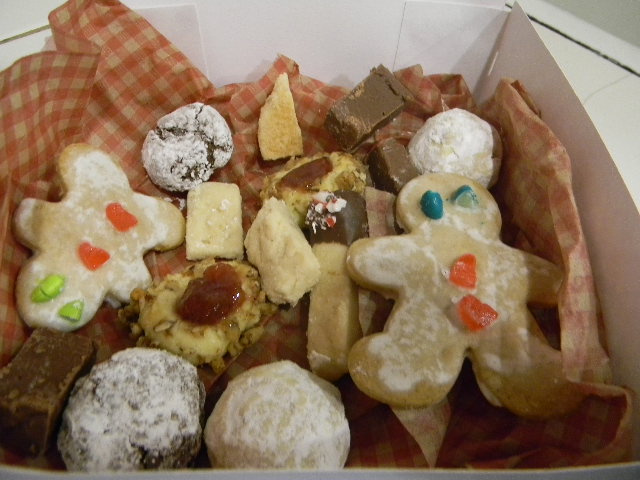
They are filled with gingerbread men, chocolate crinkles, fudge, thumbprint cookies, tea cookies and shortbread dipped in chocolate. Yummy!!
Entering this project over at Celebrate the Occasion #93 Anything Goes!
The boxes are cut at 11 1/2 ". There isn't much waste with a 12x12 piece of paper and look so darling with the ribbon and and tags. The tags were cut from the Joys of the Season Cartridge at 4". They are embossed with a Cuttlebug folder and the sentiment came from the Pink by Design Stamp set "Tags and Treats". I always have trouble stamping in white, but let's face it, it's two days before Christmas and I HAVE to get these treats delivered! And since I had twenty or so to make, it really did become a bit of a production. I know you get it. Mom's do soooo much because we want everyone to feel special, right?
They are filled with gingerbread men, chocolate crinkles, fudge, thumbprint cookies, tea cookies and shortbread dipped in chocolate. Yummy!!
Entering this project over at Celebrate the Occasion #93 Anything Goes!
Friday, December 21, 2012
Embellished Gloves
Hello everyone,
Today I am sharing the embellished gloves Sara and I have been busy working on. I was actually inspired to try something like this while helping to decorate the bookstore. There were these cute little ornaments with fabric cutouts and buttons and I thought I could make something like that!
First I tried cutting some felt in my Cricut, I really had high hopes because of all of the wonderful shapes available on the cartridges I have. I used my Deep Cutting Blade, fiddled with speed, pressure and blade depth and well, not so much... I did look up some tutorials and felt does seem to work if you have the stiff felt, which I didn't. (I do now and want to try again)
So I looked through my metal dies and discovered I really didn't have any Christmas themed dies, but I found a little bow and button die. So that's where I started. (Nestabilities would work too)
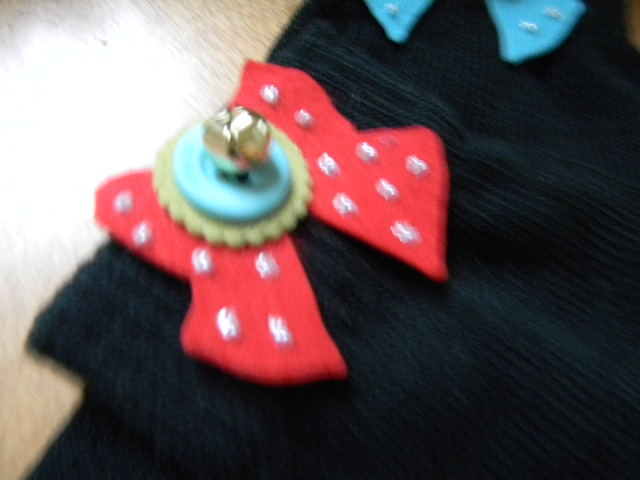
I have several colors of PTI's felt so I chose some Hawaiian Shores and Pure Poppy for the bows, and Simply Chartreuse for the button die. I also have the coordinating buttons, so we just altered the layers. The jingle bells gave them a holiday boost. We sewed them on with some embroidery thread and added some fabric paint because we thought they needed a little something extra. The gloves were found in a two-pack for about $1.50, that made each pair only $.75. Since I had everything else in my craft stash, it made it a pretty cost effective gift. And, since we made 25 pairs of these, that's a good thing. We made them for cousins, nieces, coworkers and girlfriends, oh and neighbors too!
Have a wonderful day!
Simon Says Stamps is having a Challenge: Gift-spiration.
Lot's of great ideas over there!
Today I am sharing the embellished gloves Sara and I have been busy working on. I was actually inspired to try something like this while helping to decorate the bookstore. There were these cute little ornaments with fabric cutouts and buttons and I thought I could make something like that!
First I tried cutting some felt in my Cricut, I really had high hopes because of all of the wonderful shapes available on the cartridges I have. I used my Deep Cutting Blade, fiddled with speed, pressure and blade depth and well, not so much... I did look up some tutorials and felt does seem to work if you have the stiff felt, which I didn't. (I do now and want to try again)
So I looked through my metal dies and discovered I really didn't have any Christmas themed dies, but I found a little bow and button die. So that's where I started. (Nestabilities would work too)
I have several colors of PTI's felt so I chose some Hawaiian Shores and Pure Poppy for the bows, and Simply Chartreuse for the button die. I also have the coordinating buttons, so we just altered the layers. The jingle bells gave them a holiday boost. We sewed them on with some embroidery thread and added some fabric paint because we thought they needed a little something extra. The gloves were found in a two-pack for about $1.50, that made each pair only $.75. Since I had everything else in my craft stash, it made it a pretty cost effective gift. And, since we made 25 pairs of these, that's a good thing. We made them for cousins, nieces, coworkers and girlfriends, oh and neighbors too!
Have a wonderful day!
Simon Says Stamps is having a Challenge: Gift-spiration.
Lot's of great ideas over there!
Thursday, December 20, 2012
Santa's Village Imagine Card
Good morning,
I'm back with another card this time using Santa's Village Imagine Cartridge. The polar bear was cut at 4" using the layers feature. I added some red Stickles to the scarf, Glossy Accents to the nose and dimensionals to one of the layers.
The snowflakes are from Winter Frolic Cartridge. I put them through the Xyron 2 1/2" Sticker maker and then used some Recollections Tinsel Glitter. For the white layer at the bottom of the card I just tore a piece of white paper to make it look a bit like part of a natural snowscape and ran it through a Cuttlebug folder. I thought the snowflakes made it look like it was snowing on my polar bear.
Pause Dream and Enjoy is having a challenge with a snow theme.
PDE Snow Challenge. I thought this would fit nicely.
I'm back with another card this time using Santa's Village Imagine Cartridge. The polar bear was cut at 4" using the layers feature. I added some red Stickles to the scarf, Glossy Accents to the nose and dimensionals to one of the layers.
The snowflakes are from Winter Frolic Cartridge. I put them through the Xyron 2 1/2" Sticker maker and then used some Recollections Tinsel Glitter. For the white layer at the bottom of the card I just tore a piece of white paper to make it look a bit like part of a natural snowscape and ran it through a Cuttlebug folder. I thought the snowflakes made it look like it was snowing on my polar bear.
Pause Dream and Enjoy is having a challenge with a snow theme.
PDE Snow Challenge. I thought this would fit nicely.
Wednesday, December 19, 2012
Snowman and Glitter!
I had such a great time making this little card. The snowman is cut at 3 1/2" using the Create a Critter 2 Cartridge (I know, I know, again with this cart?) I had so much fun using Stickles and Glossy Accents to make him even more adorable! The trees were cut at 2" using the Winter Frolic Cartridge. Again with the stickles to make them snow covered. I did use my Cuttlebug and some pop-dots too. When creating this card, I had in mind the Winter Wonderland Challenge over at Cardz TV. The theme was snow inspired creations.
Gingerbread Tag and little gift
Good morning everyone,
Today I'm posting a tag made from the Stretch Your Imagination Cartridge. It's the cute little gingerbread man. I saw this cut over at Cardz TV on a tag Mary made and I just had to try it.
I cut it out in the blackout feature so I could use a Peachy Keen face, (Everyday Character Faces Set), I also cut the silhouette in white to look like icing. I decided I wanted to play along with Peachy Keen Challenge for Kathy's Happy Birthday Celebration, so that is where the background design came from. For the tag I used the Christmas Cheer Cartridge, and cut it at 5" and then used the square feature to cut the scallop outline, the little squares were cut using the same cartridge and cut at 2". A Cuttlebug folder to emboss the tag, a couple of red buttons and a little doodle with a white gel pen for some details. The green gems, ribbon and jingle bell finished it off.
I made several of these to attach to some little gifts I put together. I found some darling mugs at Michaels and filled them with hot cocoa or coffee and chocolates.
Today I'm posting a tag made from the Stretch Your Imagination Cartridge. It's the cute little gingerbread man. I saw this cut over at Cardz TV on a tag Mary made and I just had to try it.
I cut it out in the blackout feature so I could use a Peachy Keen face, (Everyday Character Faces Set), I also cut the silhouette in white to look like icing. I decided I wanted to play along with Peachy Keen Challenge for Kathy's Happy Birthday Celebration, so that is where the background design came from. For the tag I used the Christmas Cheer Cartridge, and cut it at 5" and then used the square feature to cut the scallop outline, the little squares were cut using the same cartridge and cut at 2". A Cuttlebug folder to emboss the tag, a couple of red buttons and a little doodle with a white gel pen for some details. The green gems, ribbon and jingle bell finished it off.
I made several of these to attach to some little gifts I put together. I found some darling mugs at Michaels and filled them with hot cocoa or coffee and chocolates.
Tuesday, December 18, 2012
Red and White Christmas Inspired Cards
Hello everyone,
I created a couple of cards with a red and white color scheme using the Create a Critter 2 " cartridge. This cartridge is really great for the cards I wanted to make for little ones.
These little images were cut at 3 1/2", the paper is from a couple of years ago, some of it is My Mind's Eye, the cardstock is from PTI. I cut the snowflakes from Winter Frolic cartrtidge at 2". I added some stickles and little sparkle gems to the center of the snowflakes. The sentiments are stamped in Barn Door Distressed ink from the PTI Holiday Friendship Jar set.
I am entering the Celebrate the Occasion CTO Challenge #93 Christmas Anything Goes
I created a couple of cards with a red and white color scheme using the Create a Critter 2 " cartridge. This cartridge is really great for the cards I wanted to make for little ones.
These little images were cut at 3 1/2", the paper is from a couple of years ago, some of it is My Mind's Eye, the cardstock is from PTI. I cut the snowflakes from Winter Frolic cartrtidge at 2". I added some stickles and little sparkle gems to the center of the snowflakes. The sentiments are stamped in Barn Door Distressed ink from the PTI Holiday Friendship Jar set.
I am entering the Celebrate the Occasion CTO Challenge #93 Christmas Anything Goes
Monday, December 17, 2012
Create A Critter 2: Sweet Christmas Cards
Hello everyone,
Hoping your Christmas season is coming along nicely. I of course have way too many projects I have planned and of course am scrambling to complete them. But I've always thrived in chaos!
Today's cards are from the Create a Critter 2 cartridge. These sweet little cards with a little something tucked inside are going to my little cousins in San Diego.
The images are cut at 3 1/2 ". I added a bit of stickles and glossy accents for some quick details. The paper is DCWV holiday stack from years gone by and the white cardstock is from PTI.
I used some scallop punches, the sentiments are from My Creative Time's Mixed Holiday Sentiments and distressed ink in peeled paint and barn door. A bit of ribbon from the craft box and a couple of Recollections bling for fun.
Entering in the PTT #98 Kid's Christmas Challenge
Hoping your Christmas season is coming along nicely. I of course have way too many projects I have planned and of course am scrambling to complete them. But I've always thrived in chaos!
Today's cards are from the Create a Critter 2 cartridge. These sweet little cards with a little something tucked inside are going to my little cousins in San Diego.
The images are cut at 3 1/2 ". I added a bit of stickles and glossy accents for some quick details. The paper is DCWV holiday stack from years gone by and the white cardstock is from PTI.
I used some scallop punches, the sentiments are from My Creative Time's Mixed Holiday Sentiments and distressed ink in peeled paint and barn door. A bit of ribbon from the craft box and a couple of Recollections bling for fun.
Wednesday, December 12, 2012
Gingerbread House
I recently purchased the Create a Critter 2 cartridge and decided to make all of the Christmas Critters. They are adorable and so easy to assemble. I cut everything at 3 1/2 inches. A bit too big, but I was already in too deep! I chose traditional colors for my images and for this little card just added some twine, stickles and a bit of inking. The sentiment is from My Pink Stamper's Everyday Occasions. I did add some dimensionals for added depth.
I am entering this challenge over at Paper Playtime Challenge #90 Christmas Colors
Sunday, December 02, 2012
Holly Jolly Christmas Card
For today's post I made a simple card using the Gingerbread seasonal cartridge.This one is great as it only takes two quick cuts!
I used some DCWV paper and some shimmery paper from Recollections that I found in a pack at Michaels. I added some PTI satin ribbon and some Recollections red half pearls for the holly berries. The sentiment was embossed with Versamark and white embossing powder. I just followed the same color scheme for the inside and heat embossed that sentiment as well. I have had this stamp set for a couple of years and picked it up from Michaels or Joannes. Not sure the name of it.
Sara and I spent a bit of time together crafting and picking up a few crafty items from Michaels and Joannes. We even splurged and shared a large caramel chocolate bar, yummy!
I am entering this little card over at Party Time Tuesday's PTT Challenge #96 "Anything Goes"
I used some DCWV paper and some shimmery paper from Recollections that I found in a pack at Michaels. I added some PTI satin ribbon and some Recollections red half pearls for the holly berries. The sentiment was embossed with Versamark and white embossing powder. I just followed the same color scheme for the inside and heat embossed that sentiment as well. I have had this stamp set for a couple of years and picked it up from Michaels or Joannes. Not sure the name of it.
Sara and I spent a bit of time together crafting and picking up a few crafty items from Michaels and Joannes. We even splurged and shared a large caramel chocolate bar, yummy!
I am entering this little card over at Party Time Tuesday's PTT Challenge #96 "Anything Goes"
Saturday, December 01, 2012
Simple Christmas Project
Hello all,
Spent some time today with hubby, Sara, Seth and grandson Cory, decorating for Christmas, such fun and it always puts me in an even more festive mood. Watching Seth and Cory explore the decorations and find such simple pleasures in the little things like a snow globe and music box make it magical for me too. I sure am cherishing these moments, as I know they will quickly pass.
For today's quick project, I took a candle I received as a birthday gift and transformed it a bit for the guest bathroom. I used the Celebrate with Flourish Lite Cartridge and cut the image at 3". It has four cuts to complete the image. I used some Christmas papers from year's past, DCWV stacks. Since today's goal was an actual completed project.... I kept the embellishing very simple. Just some half pearls from Recollections and Stickles for some shimmer, a quick bow using PTI's Pure Poppy ribbon and it was ready to brighten the room. The pictures aren't the best, as the sun has gone down and our home doesn't have the best lighting.
Hoping all of you are enjoying your weekend, and the beginning of the Advent Season.
This is also going to be my entry over at Cards TV DT Challenge #20 "To Die For" in which we must use a die cut for our project.Cardz TV DT Challenge #20
Hoping all of you are enjoying your weekend, and the beginning of the Advent Season.
This is also going to be my entry over at Cards TV DT Challenge #20 "To Die For" in which we must use a die cut for our project.Cardz TV DT Challenge #20
Hoping all of you are enjoying your weekend, and the beginning of the Advent Season.
Saturday, November 24, 2012
So Thankful!
What a wonderful year this has been. I have so many blessings to be thankful for.
Although my crafting and blogging has taken a bit of a backseat; my little guy and my grandson are now in kindergarten! Not only kindergarten, but homeschooling too. That means I am the lucky teacher and what a journey it has been. Even though we have been homeschooling since 1991, I haven't homeshcooled kindergarten in about 10 years and wow, it's a bit of work!
I visit your blogs as often as I can and craft when I get the chance. Not much posting getting done, but hoping to change that soon.
In addition to my darling kindergarteners, Sara is now a sophmore at home and I am still managing the bookstore part time. I have a very full life, but I want to remember I am supposed to have a balance too.
I am looking forward to blogging again and carving out some creativity time for me. I am sure it will make me a better, less stressed person!
Thank you all for your inspiration.
More to come soon!!
I am enjoying this holiday weekend. We hosted Thanksgiving here and wow, did we consume enormous amounts of food. Not only were we blessed to have family and friends, but new friends as well. What a blessing. I even did a bit of shopping!
Have a blessed Thanksgiving weekend.
Subscribe to:
Posts (Atom)