Good Morning My Blogging Friends!
Today's post is for the current challenge over at Exploring Cricut
Make sure you head on over and see what crafty goodness the DT created using their Cricut Machines. Remember the top 3 get to display a nifty badge on their blog.. How fun is that???
The challenge had to include a flower and celebrate spring!
I decided on making some springy cupcake wrappers and toppers using the Cupcake Wrappers Cricut Lite Cartridge. This cartridge has a cupcake wrapper for all occasions, and only two layers, so super easy to assemble.
The flower toppers also only have two layers, so again, easy to assemble.
I chose flower 2 for the wrapper and flower 2 and 5 for the toppers cut at 2".
Since these are for eats, I didn't get too crazy on the embellishments. Just a little pearl in the center of the flowers. I f you were doing these for a shower or even wedding adding some extra embellishments would make them all the more special.
Thank you for taking a look at today's project. Happy Crafting!
Hello, welcome to "Kindred Kreations"
This blog is about our life at home, and away from home... everyday happenings, and special occasions. We enjoy a variety of pastimes, but our main joy is making "Kindred Kreations". Thank you for joining us in our journey of growing together through faith, family, love for learning, projects, and more.
Monday, April 22, 2013
Friday, April 19, 2013
Exploring Cricut Design Team Post "Camping Layout"
Good Morning Everyone,
Another super great day for me as this is my day to post for Exploring Cricut.
This layout started with the Cricut Imagine and the Good Old Days Cartridge. This cartridge is full of vintage images which remind us of the good ole days!
I printed several patterned papers to use for my background paper and photo mats. It was terrific because they all coordinated perfectly aind I didn't run out as I could just print more! I also used the "family vacation" image print and cut with using the layer feature.
Camping Critters is another favorite of mine and the other images in my layout came from this cartridge.
The car and trailer were cut 7" using all of the layers.I added glossy accents for the windows and it created a really terrific effect.
I decided to cut some critters too.
Deer and tree were cut at 4 1/2"
Raccoon and tree at 5"
Bear and tree at 4 1/4".
The "are we there yet?" sign cut at 3 3 /4". I just had to add that because of course our kids always ask that.
Thank you so much for stopping by.
Friday, April 12, 2013
Cheerful Lemonade Card
Hi All,
Back again today with another lemonade card using the "For the Love of Lemons" Digital stamp set from The Cutting Cafe
This time I used a couple of different images, cut an extra layer to add some dimension to the card.
PTI Melon Berry for the cardbase, a scrap of patterned paper from my stash, PTI ribbon, a brad and some bling. I rounded the corners for a softer look. I love these two colors together. So bright and cherry.
Thank you for stopping by, hope your day is amazing!
Thursday, April 11, 2013
"When Life Hands You Lemons"...
This quick little card was made using a digital stamp set from The Cutting Cafe .
I have several sets that I have collected over the past few years and love that they are stored in my computer, ready anytime I need them.
This set is "For the Love of Lemons" and has some really cute sentiments and lemon images. I used a circle punch for the large circle sentiment and added some twine and a little lemon brad from my stash. The card base is PTI Enchanted Evening and the patterned paper was in my scraps.
This is going to be a grown up card so I added the little martini glass (from another stamp set) embossed in white, crossed out the lemonade and added the lemon drops sentiment also from the same set and embossed it with the Swiss Dots Cuttlebug folder and punched with a scallop square.
I thought some little Peachy Faces would be adorable so I added a couple from the Everyday Character Faces Assortment set. A white gel pen and glossy accents finished it off.
Thanks for stopping by.
Have a wonderful day and make sure to do something creative!
This card is entered in the Whimisical Designs "Emboss it" Challenge
There are some amazing projects that include some wonderful embossing, but also terrific design, colors and details.
I have several sets that I have collected over the past few years and love that they are stored in my computer, ready anytime I need them.
This is going to be a grown up card so I added the little martini glass (from another stamp set) embossed in white, crossed out the lemonade and added the lemon drops sentiment also from the same set and embossed it with the Swiss Dots Cuttlebug folder and punched with a scallop square.
I thought some little Peachy Faces would be adorable so I added a couple from the Everyday Character Faces Assortment set. A white gel pen and glossy accents finished it off.
Thanks for stopping by.
Have a wonderful day and make sure to do something creative!
This card is entered in the Whimisical Designs "Emboss it" Challenge
There are some amazing projects that include some wonderful embossing, but also terrific design, colors and details.
Tuesday, April 09, 2013
"Daddy & Me" Layout
Good Morning Everyone,
I couldn't wait create something with these adorable pictures of hubby and our youngest son, Seth.
For this layout I used the DCWV Celebration Stack. Although the stack has many birthday themed papers and extras, I found plenty of what I needed to create this project.
The sketch makes it wonderful for the overall theme and sizes. I inked the papers with Tea Dye distress ink, the circles I punched from the stack, I created my own "arrows" by snipping the banner triangles also included.
I added some buttons and brads, alpha stickers and scalloped circles from my stash.
The tickets at the top, the ice cream word art, and journaling card also came from within the stack.
I have entered this layout over at DCWV April's "Stack-a-holic" Template Challenge
Thanks for stopping by.
I couldn't wait create something with these adorable pictures of hubby and our youngest son, Seth.
For this layout I used the DCWV Celebration Stack. Although the stack has many birthday themed papers and extras, I found plenty of what I needed to create this project.
The sketch makes it wonderful for the overall theme and sizes. I inked the papers with Tea Dye distress ink, the circles I punched from the stack, I created my own "arrows" by snipping the banner triangles also included.
I added some buttons and brads, alpha stickers and scalloped circles from my stash.
The tickets at the top, the ice cream word art, and journaling card also came from within the stack.
I am also entering the My Creative Time's: Designer Challenge with Miss Cassandra
The challenge is to use 3 of the 6 colors listed: red, orange, yellow, green, blue, purple
There are some amazing projects the DT has created so be sure to check it out.
Thanks for stopping by.
Monday, April 08, 2013
Exlporing Cricut Challenge "It's a Spring Thing"
Hello Everyone and welcome to another fabulous challenge over at Exploring Cricut.
This week's challenge was really fun. Your project has to include 1 button, 2 Cricut Cuts, and 3 patterned paper and/or cardstock and welcome spring!
I decided on my Imagine for this project. Lori's Garden has some wonderful images that remind me of spring. I can always use some decorated gift bags and I love to keep them handy.
I started with a white gift bag.
Using the print and cut feature, I chose the scalloped oval stock image cut at 8" with one of the patterns available from that cartridge.
Next I print and cut the lady bugs using the layer feature...4.5", 3.5" and 3".
The tag was also cut from this cartridge, I chose this one because the patterned paper was similar to the scalloped oval.
After inking the edges of all the pieces with Tea Dye distressed ink, I assembled the tag and ladybugs. I used foam tape for dimension and on the large ladybug, I used Paper Trey Inks Vintage Buttons in Melon Berry and Button Twine.
The tag was also cut from this cartridge, I chose this one because the patterned paper was similar to the scalloped oval. I added a couple of buttons to tie it altogether and used a 1/8" hole punch and Button Twine to attach to bag.
Be sure to check out all of the wonderful projects the Design Team has come up with and don't forget to play along!! You'll be sure to find lots of Cricut inspiration.
Sunday, April 07, 2013
Project Life Week 7
Hello Everyone,
This is my first year attempting Project Life and I have to say it has been wonderful. I love the freedom to keep it simple or add some extras. I will have to be careful not to feel like I have to keep adding in order to be finished....
Week 7 was Valentine's week, so I stayed with a vintage pink/rose color theme with lots of hearts.
It was a fun week to put together with all of the extra activities.
I used a 6x6 paper En Francais from Prima for the papers and various other embellishments: tile stickers, twine, Nestabilities, tags, lots of distress inks, little clips and brads.
Although I have the Cherry Edition Project Life Kit from Becky Higgins, I am finding I would rather put my
own together either to match some colors and/or occasions.
I have since subscribed to some additional kits and those are a wonderful surprise box full of goodies to also incorporate into the week's layouts. I will let you know how those work out!
Thanks for stopping by.
Friday, April 05, 2013
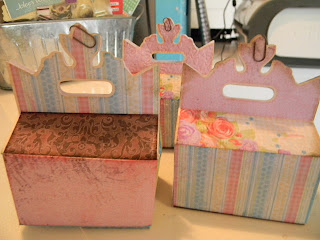
"Trio of Treat Boxes"
Hello Everyone!
What a special day this is...It's my first project as part of Exploring Cricut 's Design Team. This wonderful blog is dedicated to using all things Cricut.
I decided it would be fun to use my Imagine for this project and decided on the Imagine More Cartridge.
These gable boxes are part of the bonus content on the cartridge. I cut these using the fit to page feature and the tags were also found on this cartridge and were cut at 2.5" using the layer feature.
Here are the images print and cut using the Imagine
I assembled the boxes first using Scotch Quick Dry glue, a ruler and my bone folder
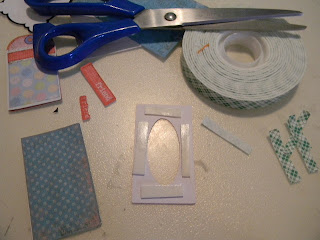
Next I started on the tags. I used the layer feature so I could add some dimension with foam tape
The embellishments for the tags included ribbon from 3 Girl Jam, PTI Vintage buttons and button twine, some fibers, pearls, distress inks, a friend sticker and a brad.
I love the Imagine for quick projects with fun results.
Have a wonderful day and thank you for stopping by.
Thursday, April 04, 2013
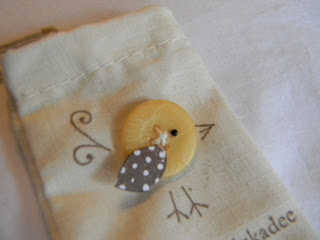
"Hey there Chickadee"
Aren't these bags just adorable?
I just love how easy they are to work with.
These became favors for our Easter Celebration.
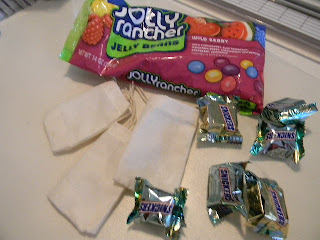
I started with a few bags from 3 Girl Jam and some yummy candy.
Paper Trey Ink's Everyday Button Bits Stamp Set worked just perfect for this project.
Other supplies included:
Memento Ink
3 Girl Jam Ribbon
brads and pearls
Paper Trey Ink Vintage Buttons and Button Twine
After stamping, I added the button and twine. Attached with a glue dot and added a tiny black pearl for the eye and a brad and pearl to the ribbon.
I am entering these little bags in the
3 Girl Jam Challenge #15 Pastel Colors with Ribbon
Be sure to check out their blog for some great crafty ideas!
Subscribe to:
Comments (Atom)


